If you love Oreos but need to skip the dairy, this Dairy-Free No-Bake Oreo Cheesecakes Recipe is going to be your new go-to treat. Creamy, crunchy, and perfectly portioned—what's not to love?

Jump to:
- Why You'll Love This Recipe
- Ingredients & Why They Work
- Make It Your Way
- Step-by-Step: How I Make Dairy-Free No-Bake Oreo Cheesecakes Recipe
- Top Tip
- How to Serve Dairy-Free No-Bake Oreo Cheesecakes Recipe
- Make Ahead and Storage
- Frequently Asked Questions:
- Final Thoughts
- Dairy-Free No-Bake Oreo Cheesecakes Recipe
Why You'll Love This Recipe
I’m honestly obsessed with how simple these mini cheesecakes are to throw together, yet they feel so indulgent and special. Perfect for sharing… or not!
- Completely Dairy-Free: Enjoy a classic Oreo cheesecake flavor without any dairy or fuss.
- No Baking Required: Just mix, chill, and decorate—so easy anyone can make it.
- Perfectly Portioned: Mini cookie cup sizes make these ideal small bites for parties or treats.
- Customizable Toppings: Finish with whipped cream swirls and Oreo bits for that extra wow factor.
Ingredients & Why They Work
Before you grab your shopping bag, here’s a quick rundown of everything you’ll need and why these particular ingredients make this dairy-free version a winner. Plus, I’ve got some tips on choosing the best dairy-free cream cheese and whipping cream to keep things smooth and creamy.

- Oreo Cookies: These make both the crunchy base and delicious cookie bits in the filling, so pick your favorite (original is classic!).
- Dairy-Free Butter or Margarine: Helps bind the Oreo crumbs for a solid base that holds shape perfectly when pressed.
- Dairy-Free Whipping Cream: I like using Elmlea’s Plant Based Alternative Double Cream for that rich, fluffy texture.
- Dairy-Free Cream Cheese: Brands like Violife or Sainsbury’s Free From provide that signature cheesecake tang without dairy.
- Extra Oreo Cookies for Topping: Adds crunch and decoration for a fun finishing touch.
Make It Your Way
One of the best things about this Dairy-Free No-Bake Oreo Cheesecakes Recipe is how easy it is to adapt to your taste and occasion. Feel free to experiment with flavors, toppings, or dietary tweaks — these mini treats are a fantastic base to get creative!
- Chocolate Lover’s Twist: I once added a tablespoon of dairy-free cocoa powder to the cheesecake filling for an extra chocolate punch — it was decadently rich and equally creamy!
- Berry Burst Variation: Swirling in some mashed raspberries or topping with fresh berries adds a bright, tangy contrast that complements the Oreo base beautifully.
- Nut-Free Adaptation: If allergies are a concern, simply ensure your dairy-free butter and cream cheese options are nut-free; this recipe naturally avoids common nut ingredients.
- Holiday Edition: Decorate with crushed peppermint candies or a dusting of cinnamon around the edges for a festive vibe.
Step-by-Step: How I Make Dairy-Free No-Bake Oreo Cheesecakes Recipe

Step 1: Crafting the Perfect Crunchy Base
Start by melting 50 grams of dairy-free butter or margarine gently over low heat; this slow melt prevents scorching and ensures a smooth mix. Blend 150 grams of Oreo cookies into fine crumbs — using a food processor works wonders for even texture. Combine these crumbs with the melted butter, stirring until the mixture feels like wet sand and holds shape when pressed between your fingers. Firmly press this mixture into each cavity of your cookie cup tin using clean hands — compacting well here is key to prevent crumbling later. Pop the tray into the freezer to chill while you prepare the creamy filling.
Step 2: Whipping Up the Creamy Dairy-Free Filling
In a medium bowl, combine 260 grams of dairy-free whipping cream (Elmlea Plant Based Alternative Double cream) with 160 grams of dairy-free cream cheese. Begin whipping on low speed to avoid splashes, then increase to high, whipping until thick and creamy — about 5 minutes. Using a balloon whisk attachment makes this a breeze, but a hand mixer works well too! Meanwhile, blitz 8 Oreo cookies until fine and fold the crumbs gently into your filling, creating delicious cookie flecks throughout.
Step 3: Assembling Your Mini Cheesecakes
Fill a piping bag fitted with a large round tip nozzle (or simply snip the end) with your luscious cheesecake mixture. Pipe the filling evenly into each cookie base in the tin. Use an offset spatula to smooth the tops perfectly flat. Freeze your creations for at least 4 hours — this firm chilling step is essential to ensure the cheesecakes hold their shape when unmolded. If you’re lucky enough to have push-up style cookie cups, gently push from the base to release each cheesecake once firm.
Step 4: Making the Whipped Cream Topping
Once the cheesecakes are firm, remove them from the freezer and place in the fridge to thaw slightly while you whip the topping. Whip 20 grams of dairy-free whipping cream on high speed until thick and fluffy — fluffy peaks mean it’s ready to pipe. Transfer to a piping bag fitted with an open star tip nozzle to create those pretty swirls on top.
Step 5: Final Touches and Serve
Pipe a generous swirl of whipped cream atop each cheesecake. Garnish each with half an Oreo cookie and a sprinkle of cookie crumbles for that perfectly polished finish. Serve chilled and enjoy these delightful, bite-sized dairy-free treats that are sure to impress every time!
Top Tip
These tips come from hands-on experience to make your Dairy-Free No-Bake Oreo Cheesecakes Recipe turn out perfectly every time. A bit of know-how can save you stress and elevate your treats.
- Compact the Base Well: Pressing the Oreo and dairy-free butter mixture firmly into your cookie cups prevents crumbling and helps your mini cheesecakes pop out cleanly after freezing.
- Whip the Filling Slowly: Start whipping your dairy-free cream and cream cheese on low speed to avoid splashes, then crank it high. The texture becomes luxuriously creamy and stable for piping after about 5 minutes.
- Freeze Until Firm: The full 4-hour freeze is key. It makes the cheesecakes set just right so they hold their shape and look beautiful when served.
- Thaw Slightly Before Decorating: Let your cheesecakes sit in the fridge a bit after freezing before you pipe the whipped cream. This prevents melting and keeps the swirls looking photo-ready.
How to Serve Dairy-Free No-Bake Oreo Cheesecakes Recipe

Garnishes
These mini cheesecakes shine with simple toppings. Classic swirls of dairy-free whipped cream crowned with half an Oreo cookie add charm and texture. For extra flair, sprinkle crushed Oreo crumbs or even a handful of vegan chocolate shavings. Fresh berries like raspberries or strawberries can add a lively pop of color and a hint of tartness that pairs beautifully with the sweet creaminess.
Side Dishes
Though these cheesecakes are delightful on their own, serving them alongside a fresh fruit salad or a light vegan sorbet complements their richness nicely. A cup of hot herbal tea or a robust coffee also pairs wonderfully, balancing the sweetness for a satisfying dessert experience.
Make Ahead and Storage
Storing Leftovers
Store any leftover mini cheesecakes in an airtight container in the refrigerator. For the best taste and texture, enjoy them within 2 days. Keeping them chilled preserves the creamy filling and crisp base beautifully.
Freezing
You can freeze these dairy-free cheesecakes before decorating. Once assembled and frozen for the full 4 hours until firm, transfer them to a sealed container or wrap individually in plastic wrap and freeze for up to 1 month. When ready to serve, thaw in the fridge for a few hours before adding the whipped cream topping.
Reheating
Since this is a no-bake dairy-free cheesecake, reheating isn’t necessary. Just let frozen cheesecakes thaw overnight in the fridge and enjoy chilled for that perfect creamy texture.
Frequently Asked Questions:
Absolutely, though this recipe is crafted for a completely dairy-free experience. Using regular cream cheese will change the flavor and nutritional profile, but it will still work well if dairy isn’t a concern for you.
Freezing for 4 hours is essential to help the cheesecake filling firm up properly so they hold their shape. You can refrigerate after they’re frozen, but skipping the initial freeze will result in a softer, less stable dessert.
Most Oreo cookies are considered vegan-friendly as they don’t contain animal-derived ingredients, but they are made in facilities that handle dairy. Always check your package if you need strictly dairy-free or allergen-free products.
Yes! You can substitute regular Oreos for gluten-free Oreo-style cookies. Just make sure the other ingredients you use are gluten-free, such as your dairy-free butter and cream cheese.
Final Thoughts
I hope this Dairy-Free No-Bake Oreo Cheesecakes Recipe brings joy and ease to your dessert making. It’s a sweet treat that’s not only delicious but also inclusive for those avoiding dairy. Whether it’s a casual weekend delight or a special occasion indulgence, these mini cheesecakes offer bite-sized happiness with every creamy, crunchy mouthful. Happy baking (or should I say no-baking!), and here’s to many delightful moments sharing this recipe with friends and family!
Print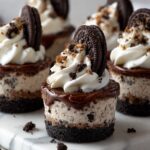
Dairy-Free No-Bake Oreo Cheesecakes Recipe
- Prep Time: 20 minutes
- Freezing Time: 4 hours
- Cook Time: 0 minutes
- Total Time: 4 hours 20 minutes
- Yield: 6 servings 1x
- Category: Dessert
- Method: No-Cook
- Cuisine: American
- Diet: Vegan
Description
Delicious mini no-bake Oreo cheesecakes made with a crunchy Oreo cookie base and a creamy dairy-free cheesecake filling, topped with whipped cream swirls and Oreo decorations. Perfectly portioned for a sweet treat that's easy to prepare without baking.
Ingredients
Base Ingredients
- 150 g Oreo Cookies
- 50 g dairy-free butter or margarine
Cheesecake Filling Ingredients
- 260 g dairy-free whipping cream (Elmlea Plant Based Alternative Double cream)
- 160 g dairy-free cream cheese (e.g., Violife Original Cream Cheese or Sainsburys Free From Soft Cream Cheese)
- 8 Oreo Cookies
Topping Ingredients
- 20 g dairy-free whipping cream
- 4 Oreo Cookies
Instructions
- Prepare the base: Melt the dairy-free butter or margarine in a small saucepan over low heat. Once melted, remove from heat and transfer into a medium heatproof mixing bowl. Blend the Oreo cookies in a blender or food processor until finely crushed. Stir the cookie crumbs into the melted butter until the mixture resembles wet sand and holds shape when pressed. Press the mixture firmly into each cavity of a cookie cup tin using clean hands to compact it well. Place the tin into the freezer to chill while preparing the filling.
- Make the cheesecake filling: In a medium bowl, combine the dairy-free whipping cream and cream cheese. Whip on low speed initially to avoid splashing, then increase to high speed. Continue whipping until thick and creamy, about 5 minutes, using a stand or hand mixer with a balloon whisk. Blend the 8 Oreo cookies into fine crumbs and fold them gently into the whipped cream mixture.
- Assemble cheesecakes: Transfer the filling to a piping bag fitted with a large round tip or snip off the end of a piping bag. Pipe the cheesecake filling evenly into each prepared cookie cup base. Level the tops with an offset spatula. Freeze the cheesecakes for 4 hours or until firm to the touch.
- Prepare the whipped cream topping: Once the cheesecakes are firm, remove them from the freezer. While they thaw slightly in the fridge, whip the remaining 20 g dairy-free whipping cream in a bowl on high speed until thick and fluffy. Transfer to a piping bag fitted with an open star tip nozzle.
- Decorate and serve: Pipe a swirl of whipped cream on top of each cheesecake. Garnish each with half an Oreo cookie and some cookie crumbles. Serve chilled and enjoy!
Notes
- To store, keep cheesecakes refrigerated and best consumed within 2 days for optimal freshness.
- For dairy-free cream cheese, recommended options include Violife Original Cream Cheese or Sainsburys Own Free From Soft Cream Cheese, both vegan-friendly.
- Pressing the base mixture firmly into cookie cups helps prevent crumbling when removing the cheesecakes from the tins.
- If you have push-up style cookie cup tins, use the base to gently release individual cheesecakes after freezing.
Nutrition
- Serving Size: 1 mini cheesecake
- Calories: 280 kcal
- Sugar: 18 g
- Sodium: 110 mg
- Fat: 18 g
- Saturated Fat: 8 g
- Unsaturated Fat: 7 g
- Trans Fat: 0 g
- Carbohydrates: 24 g
- Fiber: 1 g
- Protein: 2 g
- Cholesterol: 0 mg


Leave a Reply