Imagine a dessert that perfectly blends the rich creaminess of cheesecake with the vibrant, irresistible charm of red velvet cake. That’s exactly what this Red Velvet Chocolate Cheesecake Recipe delivers—a no-bake delight that’s as stunning as it is delicious.

Jump to:
Why You'll Love This Recipe
I’m honestly obsessed with how this cheesecake comes together—it's got that perfect balance of bold red velvet flavor and deep chocolate richness, all layered over a crunchy Oreo base that adds the perfect texture contrast.
- No-Bake Magic: Skip the oven, and let your fridge do the work for a fuss-free, creamy cheesecake.
- Oreo Cookie Base: Gives a chocolatey crunch that complements the smooth, velvety filling perfectly.
- Vibrant Red Velvet Color: Six teaspoons of red food coloring bring that striking signature hue everyone loves.
- Rich & Creamy Filling: Made with dark chocolate and block cream cheese for the ultimate indulgence in every bite.
Ingredients & Why They Work
Before you start, make sure you have good quality block cream cheese and 70% dark chocolate on hand—they’re the stars that give this cheesecake its rich, creamy texture and deep flavor. Also, chilling your cream before whipping really helps it hold those gorgeous peaks.

- Oreo cookies: Perfect for the base because they’re chocolaty and crunchy, adding texture contrast.
- Unsalted butter: Melts into the crushed Oreos to bind that base firmly without overpowering the flavor.
- Gelatine powder (unflavoured): Essential to set this no-bake cheesecake just right without it getting rubbery.
- Water: Used to bloom the gelatin, ensuring it dissolves smoothly.
- Heavy/thickened cream (cold): Whipping this cold cream creates light, airy layers in the filling and topping.
- Cream cheese (block, softened): The creamy, tangy base of the cheesecake—avoid whipped types for best texture.
- Caster sugar/superfine sugar: Dissolves easily, giving a smooth sweetness throughout the filling and topping.
- Vanilla extract: Adds warmth and depth to both filling and whipped cream topping.
- 70% dark chocolate: Gives the cheesecake a deep, rich chocolate flavor that balances the tang of cream cheese.
- Red food colouring: The secret to that classic deep red velvet hue—especially important if you’re in the UK.
- Shaved or grated dark chocolate (optional): A beautiful garnish to finish off your cheesecake with elegance and extra chocolate flavor.
Make It Your Way
One of the best things about this Red Velvet Chocolate Cheesecake Recipe is how versatile it can be. Feel free to make it your own by tweaking flavors, toppings, or even the base to suit your taste or dietary needs—there’s so much delicious potential!
- Oreo Base Swap: I’ve tried using gluten-free chocolate cookies as a base for friends with gluten sensitivity, and it worked wonderfully without losing that delightful chocolate crunch.
- Dairy-Free Delight: If you want a dairy-free version, substitute the heavy cream and cream cheese with coconut cream and a vegan cream cheese alternative. Just make sure the gelatin is plant-based, like agar agar, to keep the cheesecake set.
- Flavor Twists: Adding a hint of cinnamon or espresso powder to the chocolate cream cheese filling adds an unexpected warmth and depth—perfect for cozy evenings.
- Seasonal Flair: Top your cheesecake with fresh raspberries or strawberries in warmer months for a burst of freshness that complements the rich cocoa flavor.
Step-by-Step: How I Make Red Velvet Chocolate Cheesecake Recipe

Step 1: Prep Your Pan for Easy Cheesecake Release
Start by flipping the base of a 20cm (8 inch) springform pan upside down. Lightly butter the pan base, then press a square sheet of baking paper firmly onto it. Attach the pan sides, letting the excess paper hang over the edges—this little trick makes removing the cheesecake a breeze later. Don’t forget to butter and line the sides with baking paper, too. It’s a small step that saves so much hassle when it’s time to serve!
Step 2: Create the Oreo Cookie Crunch Base
Using a food processor or a rolling pin inside a sealed bag, crush 200g of Oreo cookies into fine crumbs. Mix these crumbs thoroughly with 60g of melted unsalted butter until combined. Press the mixture evenly and firmly into the bottom of your prepared pan base. Pop it into the fridge while you prepare the luscious filling—this will help the base set and hold firm.
Step 3: Bloom and Dissolve the Gelatin
Sprinkle 2 teaspoons of unflavoured gelatine powder over 2 tablespoons of cold water. Let it sit undisturbed for about 5 minutes to "bloom"—this step hydrates the gelatin granules for a smooth finish. Warm the mixture gently, either in short bursts in the microwave or over a pot of hot water, stirring until fully dissolved. Set it aside to cool slightly—avoiding lumps is key to a perfect set.
Step 4: Whip the Cream Until Soft Peaks Form
In a chilled mixing bowl, whip 1 cup of cold heavy cream just until soft peaks form. You want it light and airy, but not too stiff yet. Set aside carefully as this whipped cream will help keep your cheesecake filling wonderfully fluffy.
Step 5: Beat the Cream Cheese Mixture Smooth
In a large bowl, beat 500g of softened block cream cheese until silky smooth. Add ¾ cup of caster sugar and 1 teaspoon of vanilla extract, then continue mixing until fully incorporated. No lumps here! This smooth base will be the foundation of that creamy cheesecake texture you’re craving.
Step 6: Melt the Dark Chocolate Gently
Melt 150g of 70% dark chocolate carefully using a double boiler or microwave in short bursts, stirring often. You want it fully melted but not burnt or grainy. Let the melted chocolate cool slightly so it doesn’t curdle the cream cheese when mixed in.
Step 7: Combine Chocolate, Red Colour & Gelatin with Cream Cheese
Add the melted dark chocolate, 6 teaspoons of red food colouring, and the dissolved gelatin mix into your cream cheese batter. Stir gently but thoroughly until you have a smooth, evenly colored, and velvety chocolate cream cheese mixture. This is where your cheesecake starts to show its signature red velvet charm!
Step 8: Fold in the Whipped Cream for Lightness
Gently fold the whipped cream into the cream cheese mixture using a spatula. Take your time—this keeps the filling airy and soft, ensuring your cheesecake won’t be heavy or dense but delightfully light with every bite.
Step 9: Pour and Smooth the Filling Over the Base
Pour the luscious filling carefully over your chilled Oreo base. Use a spatula to smooth the surface evenly—this will give you that picture-perfect finish when you slice into it later. Once done, cover the pan and move it to the fridge.
Step 10: Chill for at Least 6 Hours
Refrigerate the cheesecake for a minimum of 6 hours, preferably overnight. Patience here pays off—this chilling step lets the cheesecake set to that perfect no-bake firmness without sacrificing its creamy texture.
Step 11: Whip Up the Creamy Topping
Whip 1¼ cups of cold heavy cream with 3 tablespoons of caster sugar and 1 teaspoon of vanilla extract until stiff peaks form. If you want it absolutely stable, you can add a stabilizer, but this isn’t essential.
Step 12: Add the Topping and Garnish Beautifully
Spread or pipe the whipped cream topping evenly over your set cheesecake. For a professional touch, sprinkle 2 tablespoons of shaved or grated dark chocolate on top—this not only looks stunning but adds a lovely bittersweet contrast to the sweet cream.
Step 13: Serve and Impress!
Use the overhanging baking paper to carefully lift the cheesecake out of the springform pan. Slice with a sharp knife, wiping it clean between cuts for neat edges. Serve chilled and watch your guests marvel at this rich, creamy, and strikingly beautiful no-bake Red Velvet Chocolate Cheesecake!
Top Tip
Mastering the Red Velvet Chocolate Cheesecake Recipe is all about attention to detail and a few key tricks that elevate this no-bake delight from good to truly showstopping.
- Perfect Base Pressing: I always press the Oreo crumb base firmly and evenly using the bottom of a flat glass. This ensures the crust sets well and doesn't crumble when sliced.
- Gelatin Blooming Matters: >From trial and error, blooming the gelatin fully before dissolving it gently ensures the cheesecake sets perfectly without any lumps or rubbery texture.
- Whip the Cream Cold: Cold heavy cream whips better and holds peaks more reliably — I always chill my mixing bowl too for the creamiest filling texture.
- Red Food Colouring Tip: For the signature rich red velvet shade, especially in the UK, I recommend using gel or paste red colouring to avoid a watery texture and achieve that vibrant colour.
How to Serve Red Velvet Chocolate Cheesecake Recipe

Garnishes
The whipped cream topping is both silky and luscious, but you can add an extra wow factor with some shaved or grated dark chocolate sprinkled on top. Fresh berries, like raspberries or strawberries, also make a beautiful, slightly tart contrast to the richness of the cheesecake.
Side Dishes
This dessert shines on its own, but if you want to offer something else, consider serving it alongside a brewed coffee or a rich hot chocolate. Light fruit salads or a citrus sorbet can also provide a refreshing balance to the creamy decadence of the cheesecake.
Make Ahead and Storage
Storing Leftovers
Store any leftover Red Velvet Chocolate Cheesecake covered in the refrigerator. It will keep well for up to 3 days, maintaining its creamy texture and striking colour.
Freezing
This cheesecake freezes beautifully. To freeze, remove from the springform pan, wrap tightly in cling film, and then in foil. Freeze for up to 1 month. Thaw overnight in the fridge before serving for best results.
Reheating
This is a no-bake cheesecake best enjoyed chilled, so reheating is not recommended. Just ensure you take it out of the fridge about 10 minutes before serving so it softens slightly for easier slicing and a creamier mouthfeel.
Frequently Asked Questions:
Absolutely! While Oreo cookies add a delicious chocolate crunch, you can use other chocolate or even plain biscuits like graham crackers or digestive biscuits, just keep the ratio the same to maintain the texture.
Gelatin is key for setting this no-bake cheesecake so it holds its shape when sliced. Properly blooming and dissolving it ensures the cheesecake isn't rubbery but perfectly firm yet creamy.
The bold red velvet signature color requires a generous amount of food colouring, particularly because dark chocolate can dull the hue. Using high-quality gel or paste food colouring helps achieve that vivid red without making the filling runny.
Yes! In fact, I recommend making it at least 6 hours ahead—or overnight—to allow the cheesecake to set fully. This makes it perfect for impressing guests at special occasions without last-minute stress.
Final Thoughts
Making this Red Velvet Chocolate Cheesecake Recipe is a joyful experience — it blends show-stopping color with luscious, creamy chocolate goodness. Whether you're baking for a celebration or a cozy night in, this no-bake dessert never fails to impress and delight. Trust me, once you try it, it’ll quickly become a favorite to make again and again. Happy cheesecake indulging!
Print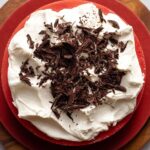
Red Velvet Chocolate Cheesecake Recipe
- Prep Time: 30 minutes
- Chilling Time: 6 hours
- Cook Time: 0 minutes
- Total Time: 6 hours 30 minutes
- Yield: 12 servings 1x
- Category: Dessert
- Method: No-Cook
- Cuisine: American
Description
A no-bake red velvet cheesecake combining the rich, creamy decadence of cheesecake with the bold, striking color and flavor of red velvet cake. This decadent dessert features a chocolatey cream cheese filling with a crunchy Oreo cookie base, perfect for impressing guests at special occasions.
Ingredients
Base
- 200 g Oreo cookies (1.5 standard packs)
- 60 g unsalted butter, melted (4 tbsp)
Gelatin Mixture
- 2 tsp gelatine powder (unflavoured)
- 2 tbsp water
Cheesecake Filling
- 1 cup heavy/thickened cream, cold
- 500 g cream cheese, softened (block form)
- ¾ cup caster sugar / superfine sugar
- 1 tsp vanilla extract
- 150 g 70% dark chocolate
- 6 tsp red food colouring
Whipped Cream Topping
- 1 ¼ cups heavy/thickened cream, cold
- 3 tbsp caster sugar / superfine sugar
- 1 tsp vanilla extract
- Optional: 2 tablespoon shaved or grated dark chocolate (for garnish)
Instructions
- Prepare the Pan: Invert the base of a 20cm (8 inch) springform pan and lightly butter it. Press a square sheet of baking paper onto the base. Attach the pan sides to the base, allowing excess paper to hang over the edges for easy removal. Butter and line the sides with baking paper as well.
- Make the Base: Crush the Oreo cookies into fine crumbs using a food processor or by placing them in a bag and crushing with a rolling pin. Mix the crumbs with melted butter until combined. Press the mixture firmly into the prepared pan base to create an even layer. Refrigerate to set while preparing the filling.
- Bloom the Gelatin: Sprinkle the gelatine powder over 2 tablespoons of cold water and let it sit for 5 minutes to bloom. Then gently warm the mixture (using a microwave or over a pot of hot water) until completely dissolved. Set aside.
- Whip the Cream: In a cold bowl, whip 1 cup of cold heavy cream until it forms soft peaks. Set aside.
- Prepare the Cream Cheese Mixture: In a large mixing bowl, beat the softened cream cheese until smooth and creamy. Add the caster sugar and vanilla extract, then continue beating to incorporate fully.
- Melt the Chocolate: Gently melt the 70% dark chocolate using a double boiler or microwave in short bursts, stirring frequently to avoid burning. Allow to cool slightly.
- Combine Ingredients: Add the melted chocolate, red food colouring, and dissolved gelatin to the cream cheese mixture. Mix thoroughly until evenly combined and smooth.
- Fold in Whipped Cream: Gently fold the whipped cream into the cream cheese mixture to keep the filling light and airy.
- Assemble the Cheesecake: Pour the filling over the chilled Oreo base in the prepared pan. Smooth the top evenly using a spatula.
- Chill the Cheesecake: Refrigerate the assembled cheesecake for at least 6 hours or overnight until fully set.
- Prepare the Whipped Cream Topping: Whip 1 ¼ cups of cold heavy cream with 3 tablespoons caster sugar and 1 teaspoon vanilla extract until stiff peaks form. Optionally, you may stabilize the cream if desired.
- Add Topping and Garnish: Spread or pipe the whipped cream over the set cheesecake. Garnish with shaved or grated dark chocolate if using.
- Serve: Carefully remove the cheesecake from the springform pan using the baking paper edges. Slice and serve chilled.
Notes
- This is a no-bake cheesecake with a rich, velvety texture that melts in your mouth.
- Use block cream cheese for the creamiest texture; avoid whipped or spreadable versions.
- The red food coloring is crucial for the signature red velvet color, especially for UK readers who may require a specific type.
- For best results, chill the heavy cream before whipping to create stable peaks.
- Gelatin blooming and dissolving correctly ensures the cheesecake sets perfectly without being rubbery.
- The Oreo cookie base adds a chocolatey crunch that complements the smooth filling.
- The optional grated dark chocolate garnish adds a touch of elegance and extra flavor balance.
Nutrition
- Serving Size: 1 serving
- Calories: 540 kcal
- Sugar: 29 g
- Sodium: 210 mg
- Fat: 43 g
- Saturated Fat: 25 g
- Unsaturated Fat: 14 g
- Trans Fat: 0.2 g
- Carbohydrates: 37 g
- Fiber: 2 g
- Protein: 6 g
- Cholesterol: 103 mg


Leave a Reply